As a YouTuber, a thumbnail is quite literally your video trying to make a good first impression. And how can it make a good impression? Your YouTube thumbnail size should be just perfect (so parts don’t get cropped off), the colors should be attractive, should accurately represent your video, and should look good overall.
Moreover, YouTube has certain specifications and policies regarding thumbnails. So, clearly, you can’t just haphazardly edit together a picture and slap it onto the channel without much thought; that won’t work.
It all sounds overwhelming, but it really isn’t. With this simple guide to making the perfect YouTube thumbnail, you should be alright.
But let’s begin with the basics first.
What is a YouTube thumbnail?
A YouTube thumbnail is a still image representing a video on YouTube. You’ll find them in your search results, recommendation lists, channel pages, and on other web pages where YouTube videos are embedded.
The function of a thumbnail is very similar to that of a book cover or an album cover. They draw in a potential viewer while also giving them an insight into the content.
When you upload a video, YouTube automatically extracts some stills and suggests them for you to use as a thumbnail. You can either pick any of these or make one from scratch and use that instead.
Note:
- You cannot upload custom thumbnails for YouTube shorts like long-form videos.
- If you get an error message “Daily custom thumbnail limit reached,” then you cannot upload a thumbnail for the next 24 hours.
Ideal YouTube thumbnail dimensions and other specifications
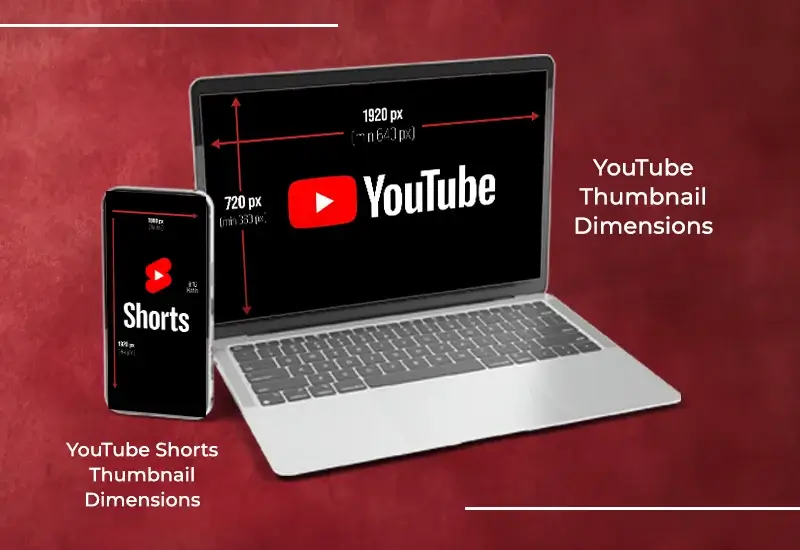
There are three kinds of thumbnails when it comes to YouTube: regular videos, podcast videos, and YouTube Shorts.
- YouTube Thumbnail Size: 1280×720 pixels, i.e., aspect ratio of 16:9 with the width of 640 pixels minimum.
- Podcast Thumbnail Size: 1280×1280 pixels, i.e., aspect ratio of 1:1.
- YouTube Shorts Thumbnail Size: 1920×1280 pixels, i.e., aspect ratio 9:16.
Note: You can change the thumbnail image for shorts using the YouTube mobile app.
Apart from the size of the picture, there are other YouTube thumbnail specs you must follow when making your thumbnail. They are:
- File size: maximum of 2 MB.
- File format: YouTube accepts most image file types, including JPEG/JPG, PNG, and GIF.
How to create a YouTube thumbnail?
To reiterate what we’ve said, if you have a choice between choosing a thumbnail suggested by YouTube and making one yourself, we will always recommend that you make it from scratch. So, how do you create a thumbnail from scratch?
Step 1: Choose the right dimensions
As mentioned before, YouTube has prescribed certain dimensions when it comes to thumbnails. For a regular video, the size should be 1280 x 720 pixels (minimum width of 640 pixels) with an aspect ratio of 16:9. For YouTube Shorts, it’s 1920 x 1080 pixels with an aspect ratio of 9:16.
Step 2: Choosing a background
You can put a solid color, shapes, graphical elements, or an image as the background. If you have decided to make an image your background, you should always use high-quality images that are relevant to your video. It can either be a still from the video or a collage of images related to the content.
Step 3: Include graphical elements
If possible, use graphical elements like borders, arrows, lines, speech bubbles, etc., to guide the viewer’s eyes and elevate the look of the thumbnail.
Step 4: Add some text
Adding text to your thumbnail gives the potential more information that will encourage them to click on your video. Use catchy phrases or keywords to make your video rank in the search, as well as pique the users’ interest. Make the text bold and clear and use a contrasting font color so that it pops out of the background and can be read easily on any device.
Step 5: Add your branding elements
Add your branding elements, if there are any. Most YouTubers don’t use logos, but if you have one, include it in the image so your videos are more recognizable. One branding element everyone should use is color. Pick a few colors to represent your brand and use them consistently in your thumbnails for a uniform and professional look.
Step 6: Preview and export
Check the image you have just made for errors, clarity, and quality, and make any necessary changes or adjustments. Once that’s done, export the image as a JPEG/JPG, PNG, or GIF.
If you aren’t confident in your graphic design skills, you can always outsource the YouTube thumbnail design to a professional.
Tools you can use to create thumbnails
As a content creator, you’ll need a good photo editor that you can use at any time on any device. Here are some of the best photo editing tools preferred by YouTubers:
- Adobe Photoshop
- Canva
- Microsoft Designer
- Pixlr
Tips for creating a YouTube thumbnail
The thumbnail MUST accurately represent the content
The most basic function of the thumbnail is to serve as a representative of your video on your YouTube channel, search results, etc. In addition to describing the content, it should explain why the user should watch your video.
Don’t use images that mislead the viewer. Even YouTube has expressly stated that this is against their thumbnail policy. Showing a picture of a lion attacking its prey while talking about how a cat hunts its food is misleading. Such thumbnails make the viewer feel like you’re click baiting them, and they will exit your video without even watching it. If you keep using misleading images, your bounce rate (when people exit your video as soon as they open it) will increase, and users will eventually stop paying any attention to your videos.
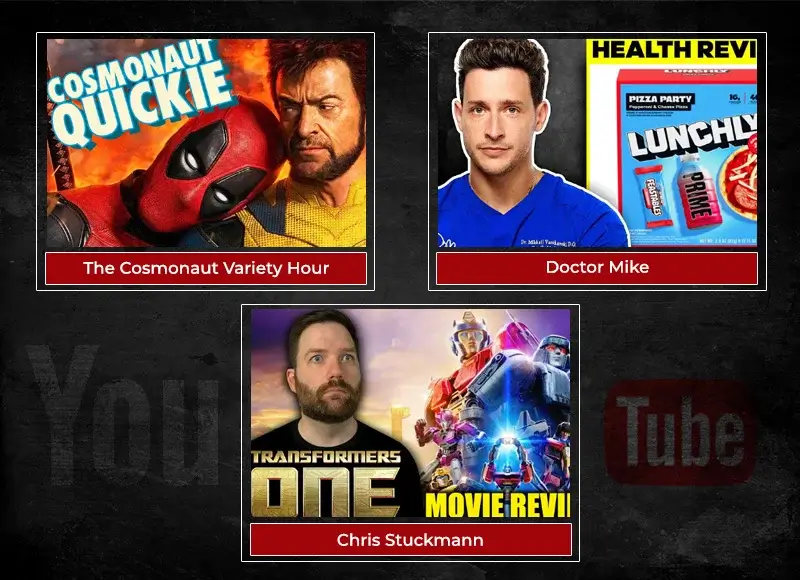
Include a person in the image
Look at the following thumbnails and see what’s common.

That is correct. They all have someone in them. If your video has you or someone else talking or presenting something, it’s always advisable to have that person’s picture included in the thumbnail. With such images, your subscribers and fans can immediately identify a video as yours when they are simply browsing through their feed.
If you have other collaborators, include their pictures so their fans and subscribers will click on your video with curiosity.
Not to say that faceless videos don’t do well on YouTube, but when viewers see a human face (especially a familiar one) in an image, they tend to feel like trusting the person and forming an emotional connection. The connection and trust only grow as they keep watching your content.
Moreover, if the person in the image is making a face – irritated, sad, happy, etc. – the viewer becomes more curious about the video. Even if you run a faceless YouTube channel, you can still use stock images of people or an avatar to pull the viewer in. If you’ve heard of a VTuber (virtual YouTuber), you’ll know exactly what I’m talking about. They are YouTubers who make avatars or characters that represent them using motion capture.
Use text to add more context
Adding an image to your thumbnail gives the viewer some context about the video, but it’s not always enough. You need to incorporate text to give your audience more information and highlight the uniqueness/appeal of your video.
However, you need to be careful not to put too much text in the image. Thumbnails aren’t that big, to begin with, and putting a lot of text will make it crowded and ugly. So, use short phrases or single words that will hint at the topic covered in the video. Also, make the font large enough to be read on a smartphone, as thumbnails appear smaller on phones than on a computer.
Remember that the video’s title will appear below the thumbnail, so you don’t have to divulge too many details… unless your title itself is vague. Take the thumbnails below as an example:
Use colors that make your thumbnails pop
Why are male birds and flowers so colorful? Why are most advertisements so vibrant? There’s only one answer to these questions – to attract. Male birds need to attract the females, and flowers need to attract pollinators. Advertisements, on the other hand, need to attract leads.
Following the same logic, you should use appealing colors that attract potential viewers, as well as suit the video’s theme/content. Preferably, you should use colors that help each individual element in the thumbnail stand out from the background and other videos on the list.
You can learn more about color theory to figure out what colors will work overall for your channel and for the different categories of topics. Take Jeremy Jahns for example.
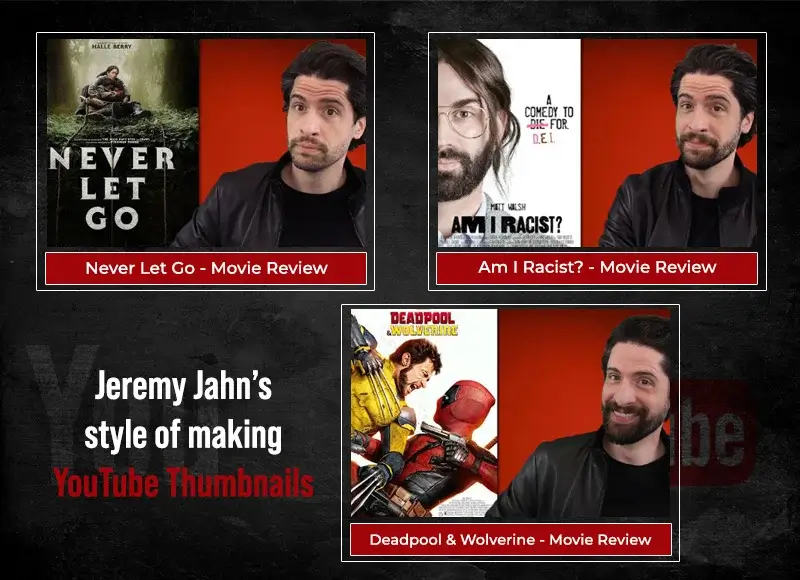
He’s a reviewer of movies, shows, games, etc. Till a few years ago, he used different background colors to indicate the category of the topic. For movie and TV show reviews, he used a red background. When he talked about trailers, spoilers, or updates, he used a blue background. For game-related content, he’d use a green or blue background. These colors used to be reflected in his thumbnails as well, but more recently, he uses only a red background in all the thumbnails, even though the video has a different color. This may have something to do with having a uniform look for the channel.
Create a signature thumbnail style
A YouTube thumbnail is not just a representative of your video; it’s a branding opportunity. Like with any other branding exercise, you need to figure out the right font, colors, and graphics in your thumbnails. Your arrangement of elements is another way to make your images unique. Once you settle on a style, you need to use it consistently across all your thumbnails for uniformity and recognition.
Always preview and test the image before you use it
It goes without saying that you should always preview any piece of content before you post it on the internet. People are quick to find mistakes and blow them out of proportion. Apart from that, you should check the image on your phone to ensure that all the elements are crisp and clear.
Now over to you
Making a YouTube thumbnail isn’t all that hard, but you do need to pay attention to the specifications, like the dimensions, file size, aspect ratio, etc. Also, strictly follow YouTube’s thumbnail policies, as users can report your channel for violations. Other than that, keep in mind that simple things like adding attractive colors, text, images, and graphics go a long way in making fun and appealing thumbnails.