The human eye is amazing and can send amazing visuals to your brain like nothing else. We can only recreate these stunning visuals with cameras and editing, and color correction is the first step toward achieving perfection.
Color correction is when images and videos are edited to look more natural. It is a vital process in post-production, as it can affect your final product. We must learn more about correction and understand the process to know exactly how important correction is.
In this article, we will cover:
- What is color correction?
- What is the process? and
- Why is it important?
So, let’s get to it, shall we?
What is color correction?
Color correction is a technical process and the first step in post-production, where color issues in raw images and footage are fixed to look natural to the human eye. The color is adjusted to mimic how the hues and tones appear in the real world and unify the entire video footage. For example, removing a color cast that makes your whites appear blueish or yellowish or correcting skin tones to make them appear more natural.
The first step in video or photo editing is this procedure, and color grading typically comes next. Here, editors adjust exposure, contrast, white balance, and other aspects to accurately represent colors. For example, correcting white balance can help your hues appear more accurate and real.
Color correction vs. color grading
While the two terms seem similar and are sometimes used interchangeably, color grading is a different process. The approach behind a correction is purely technical, and the goal is to correct and unify the colors in a video or a series of images.
When grading colors, the approach is more artistic and helps set a mood or create tension, suspense, etc.
What is the color correction process?
Choose your scopes
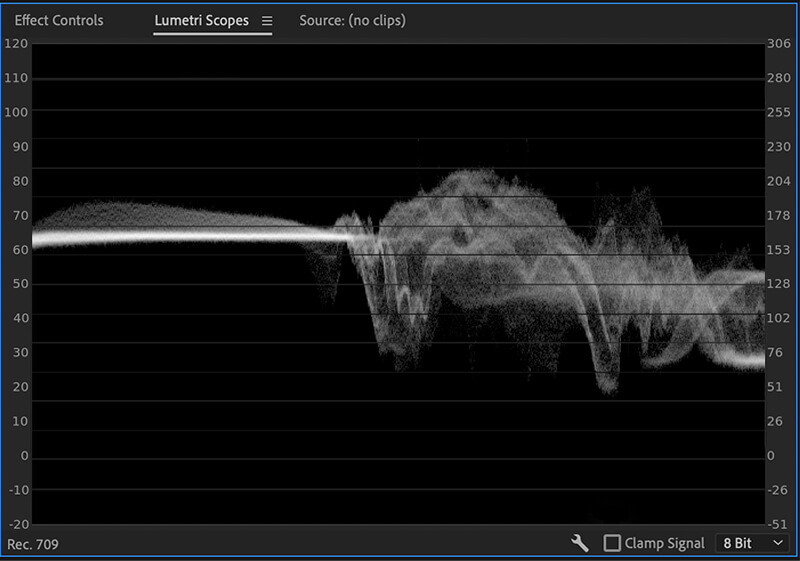
You can’t rely only on monitors when editing videos or photos, as most are not configured to represent colors accurately. That is why you must choose scopes in your editing software before color-correcting raw images or footage.
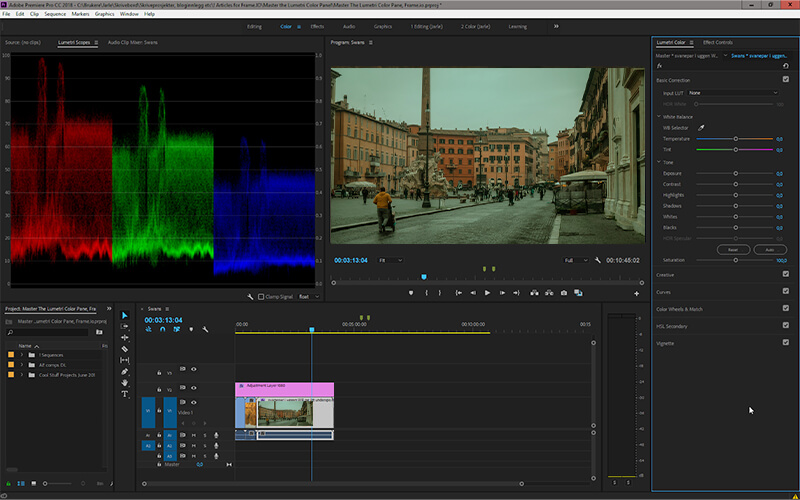
Scopes are visual aids used to see the distribution, range, and relationship of the hues in images or clips. They help you identify color casts, contrast, white balance, skin tones, saturation, and more.
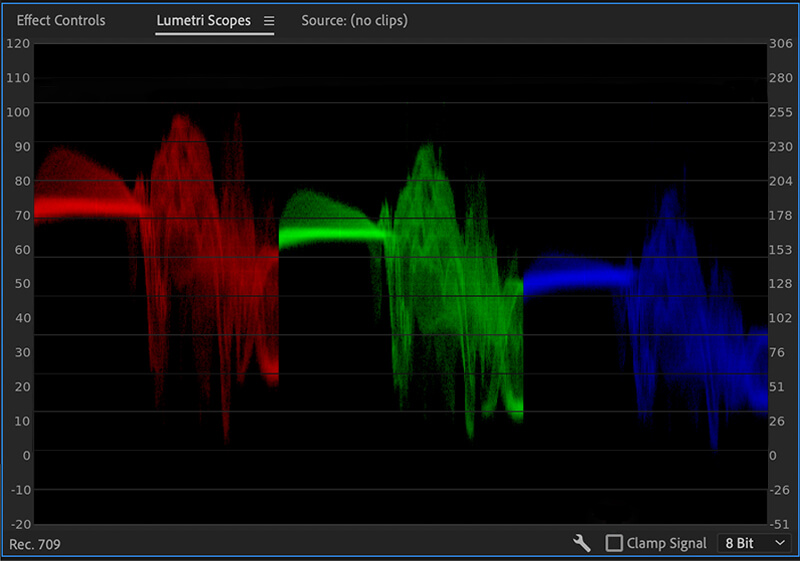
The parade (RBG) graph in Adobe Premiere Pro
For example, Adobe Premiere Pro has several scopes that act as calibration tools for coloring footage. Most video editing companies and professionals prefer using the Lumetri Scopes, which contains the vectorscope YUV, parade (RBG), and waveform (luma) graphs. Parade (RBG) is used to fix white balance, waveform (luma) helps correct brightness, and vectorscope YUV helps correct the color balance.
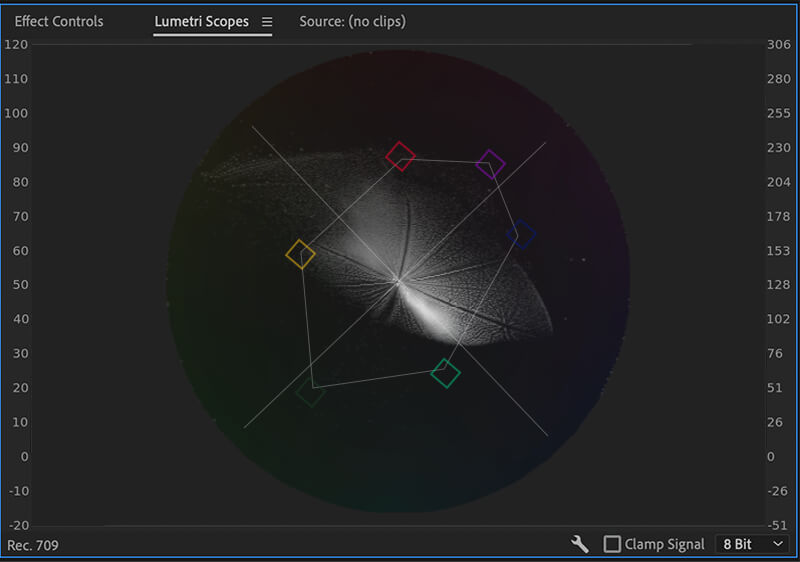
The vectorscope YUV graph in Adobe Premiere Pro
Every editor has their workflow and style of editing photos and videos. Choose the scopes that are easy for you to use or give you results that match your vision.
Choose your reference frame or picture
One of the goals of color correction is to ensure consistency across all images or clips. That is because film or photoshoots are sometimes done with multiple cameras. Each camera has its quirks, settings, and issues resulting in different hues and color temperatures. Looking at raw clips from different cameras back-to-back can be quite unpleasant.
This step is unnecessary for photo editing unless you assemble an album or cover an event. But it is an important step for video editors, as it helps simplify the work. Pick one clip to use as a reference after you have finished correcting it. This clip should be the most balanced before correction (regarding coloring and exposure).
Once you have corrected the reference shot with the steps mentioned below, you can match the rest of the images or footage with it.
Apply LUTs where necessary
LUTs, or lookup tables, are presets that help an editor easily alter tones and hues during video color correction. LUTs are primarily used in post-production by video editors, colorists, and filmmakers as they can help correct issues caused by camera settings or shooting conditions. You can use the LUTs in your software, download new ones, or create your own.
Adjust the white balance
Before making any other adjustment to your image or video, you must balance the whites. The goal is to make the whites appear true white so that all other hues in your project appear as natural as possible.
You can adjust the white balance by manipulating the color temperature, tint, and saturation. Color temperature refers to the “warmness” or “coolness” of hues and ranges from blue (cool) to orange (warm). Tint is the balance between green and magenta in a photo or footage.
Saturation refers to the intensity of hues in the photo or clip. Reducing the saturation will give you a black and white image and the reverse will give you an image with intense colors. Adjust these parameters to make the hues more natural and remove any color cast.
Adjust the lighting
The next step is to make your image or video crisp and clear by adjusting the lighting. You can achieve this by adjusting the exposure, contrast, highlights, shadows, white levels, and black levels. The objective is “lift” the dark areas to make them more visible and tone down the brightness of the highlights of an image. Basically, you must even out the lighting in this step.
Secondary color correction
All the above adjustments are primary color corrections. In primary correction, we unify the colors in the overall image or scene. In secondary correction, we make adjustments to targeted areas (based on color, hue, etc.) in a picture or clip without disturbing anything else. For example, changing a red car to a green car, making a dull sky appear bluer, or adjusting the tone and hues of your midtones, shadows, and highlights individually.
Tools for secondary correction
It is also how you can show only one hue in an otherwise black-and-white video and adjust skin tones.
You can make these secondary corrections using tools like curves, color wheels, and HSL (hue, saturation, and luminance) Secondary panels. These tools are more complicated than the rest but give you greater control and functionality.
Correcting skin tones
The human eye easily notices inconsistencies in skin tone. That is why it is important to match the skin tones of your main characters between clips. You can adjust skin tones by altering white balance and using the vectorscope YUV (in Adobe Premiere Pro).
In the vectorscope YUV, you will see a line representing the skin tone following the –i axis. To adjust the skin tone, apply a mask to visible skin like the face or hand and make the changes.
Why is color correction important?
No matter how much you try to perfect your lighting and camera settings during shoots, not everything will go as planned. The images and videos may become oversaturated or overexposed due to lens issues, power fluctuations, and weather conditions.
Color correction helps remove these issues so that the picture or video looks natural to the human eye. It also helps make footage or images taken with multiple cameras more consistent, giving them a unified look. This process is an important step in post-production as it ensures the quality of the finished product after grading and other artistic touches.
Summing up!
Color correction is an important part of the post-production process as it helps remove coloring issues and unifies footage and videos from multiple sources.
Here are a few points you should take away from this article:
- It helps unify and make your image and footage consistent.
- It helps make the photo or video look more natural.
- It helps improve the results of color grading and other artistic editing techniques.
- It is not the same as color grading.
- It involves basic edits, where you correct the hues in the overall scene, and secondary edits, where you correct selected parts.
We hope this article has helped you understand the topic better and inspired you to delve deeper into the field of video editing.

